Minimizing or Eliminating Assessments for Plumbing Replacements in Condo Buildings
 We have heard about condo association unit owners being assessed $30,000 to $50,000 dollars per unit to replace the plumbing in High rise condominium buildings. This usually comes up when buildings are 50 years or older or as scheduled by the Homeowners Association’s reserve study. There are usually two thoughts when it comes to replacing anything in buildings:
“IF IT’S NOT BROKEN DON’T FIX IT” OR “BETTER TO BE SAFE THAN SORRY”
Here are a couple of consequences associated with plumbing failures in buildings:
- Water damage that causes costly repairs; and
- Increased insurance costs
The constructionplace.com solution
Here is Constructionplace.com’s solution for minimizing or eliminating these costly assessments. This approach not only saves lots of money but also minimizes overall disruption to the individual units and the building common areas during the work:
- This approach allows plumbing replacement work to be completed over a period of time as individual units are upgraded or remodeled.
- This approach encourages units’ owners to update or remodel their units because of the overall cost savings they will incur by using this management system; and
- This approach ensures that the building’s minimum requirements for concealed building components are used and installed when the work is being completed.
Objectives
- Minimize or eliminate plumbing replacement assessments in condominium high rise buildings.
- Learn how your buildings plumbing system works for improving preventative maintenance procedures.
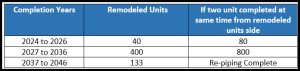
- Whenever possible complete plumbing replacement work for adjacent units from remodeled units’ side to minimize disruption thus completing the work for two or three units at same time. Here is an example of a 10-year plumbing replacement project for a condominium building with 1013 units:
4. Purchase plumbing materials at Cost directly from the wholesaler for dramatic cost savings for installation by the respective contractors performing the work.
Understanding the Plumbing System in Buildings
There are two parts of a Building’s overall plumbing system, Sewer and Water Supply:
Water Supply – Our Definition of Water Supply as used herein is a piping system for bringing hot and cold water into a building supplying that water to various fixtures such as sinks, lavatories, toilets, showers and laundry appliances.
- PVC
- Copper
- Galvanized
- Black Iron for fire protection lines
Identifying Water Supply problems – Poor Water Pressure: Low water pressure is a tell-tale sign of severely corroded pipes. As corrosion builds up inside the pipe, water flow is drastically reduced to faucet sinks, showerheads and more.
Sewer – Our definition of Sewer as used herein is a piping system for removing wastewater from a building.
Building Sewer (BS): The building sewer is the main Drain, Waste and Venting system (DWV), which collects all of the building’s wastewater from the fixtures and appliances and directs the water and waste into the municipal sewer system.
And here are five components within a DWS the order of which they are installed in new buildings:
- Building Drain (BD): The building drain is a horizontal pipe that runs underneath the building. This pipe is connected to the local municipal sewer system piping.
- Waste Stack (WS): The waste stack is the DWV’s main vertical pipe inside the building. The waste stack receives all the discharge and directs it with flow to the building drain. The waste stack must always have a clean out at its base per code.
- Stack Vent (VS): The stack vent is a dry piping system that continues from the waste stack to the roof releasing sewer gases. The diameter of the stack vent must be the same as the waste stack to work effectively.
- Vent Stack (VS): This is the primary vent on a drain, waste and vent system. This vent size depends on the amount of discharge load throughout the building. Vent stacks are also required to have cleanouts at the base. The vent stack picks up all the lines in the building and redirects it to the stack vent to exit the building.
- Cleanout (CO): The cleanout is designed to access the inside of the pipe in case anything goes wrong such as clogs.
How do you know if plumbing systems needs to be replaced?
Warning Signs that Sewer Line Needs to Be Replaced
- You Hear Gurgling Coming from the Pipes
- The Water Is Slowly Draining
- The Smell of Sewage Lingers
- The Toilet Bowl Water Level Is Up and Down
However, only defective or damaged pipes would be replaced or repaired during a piping repair or replacement project based on a survey or inspections.
Simple tips for Inspecting Pipes
- Look for signs of cracks.
- Check for leaks.
- Check for high or low water pressure.
- Look for signs of Cracks.
- Check for signs of corrosion – Corrosion is easily spotted through discoloration due to oxidation. If you previously painted your steel pipes, look for signs of paint chipping or splitting, can signify the start of corrosion.
Investigation and Inspection Methods
Here a couple of those inspection methods:
- Ultrasonic (Non-Destructive) – Ultrasonic inspection uses sound reflections in order to determine pipe thickness and to locate defects in welds and materials. Ultrasonic testing has been widely accepted as the ideal technique for detecting corrosion in pipes, with phased array ultrasonic testing allowing for precise wall thickness measurements to help determine the presence of this otherwise hidden damage mechanism.
- Destructive Investigations – Open walls to expose the pipes to inspect.
- Camera Inspection (Non-Destructive) – Allows the plumber to see the inside of your pipes by attaching a small camera to the end of a snake and running it through the inside of your pipes. The camera then transmits the image, in real-time, to a nearby monitor in order to determine the problem and its location.
- Magnetic Particle Test – Magnetic particle testing is a non-destructive test method, which can be used to inspect a variety of ferromagnetic components and products. These include castings, forgings and weldments.
Inspection of Building Areas
Look at Existing Conditions – Divide the building into high and low use/occupancy areas by identifying climate exposure sides of the building Weathering and exposure to harsh elements are cause for accelerated wear and cracking.
Entire Building – Based on the above randomly inspect units throughout the building. Whenever, possible inspect units that at currently being remodeled or updated because these units most likely have exposed plumbing pipes.
Identify Remodeled Units – Identify units that have been remodeled or upgraded. And if possible, find out the extent of any plumbing upgrades in the following areas:
- Kitchen
- Bathroom 1
- Bathroom 2
- Both
Material Options
Today Drain, Waste & Vent system (DWV) can be installed using three material types. Most likely this material selection we be driven by the existing materials currently installed and the findings from your Investigation(s) mentioned above.
- Polyvinyl Chloride (PVC)
- Acrylonitrile Butadiene (ABS)

Both PVC and ABS are non‑toxic and resistant to abrasion. They are light in weight, affordable and easy to join and work with. And studies support that PVC is immune to corrosion, a minimum service life of at least 100 years can be expected.
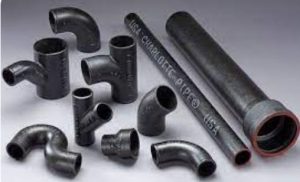
- Cast- Iron
Cast Iron pipe is commonly used, but it’s also a heavy material that requires equipment to cut the pipe and install it. Cast iron, has a life span of 80 to 100 years. There are two conventional methods of joining these pipes together:
- No-Hub Soil pipe
- Hub Soil pipe
Pipe Relining – Pipe relining is a process of repairing damaged or deteriorated pipes from the inside without the need for opening walls or excavation. Here are a few reasons why pipe relining may be worth it:
- Minimal disruption: Pipe relining is a minimally invasive process that involves inserting a liner into the damaged pipe eliminating mess, noise, and damage that come with opening walls excavation.
- Cost savings: Pipe relining is often more cost-effective than traditional pipe replacement because there is no need for opening large wall areas to expose the pipes and excavation, and the process can often be completed in a single day.
- Environmentally friendly: Pipe relining is an environmentally friendly solution because it reduces the amount of waste generated from wall removal debris, excavation and pipe replacement.
NOTE: Relining is a method used in lieu of replacing pipes and is primary ideal for piping in the ground and building where piping is exposed. And in our opinion the piping using the method should be free of corrosion and cracks.
Project Management Suggestions
It is essential to establish the right team for your Plumbing replacement project, list all necessary activities and responsibilities, and of course set a budget. To set your budget you will need to Identify and Select the materials proposed for the project.
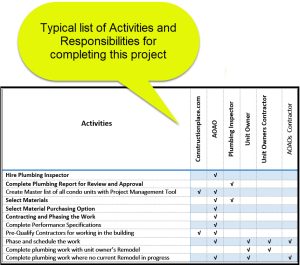
Sample Activities and Responsibilities
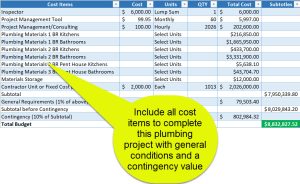
Sample Budget
Identify and Select Materials
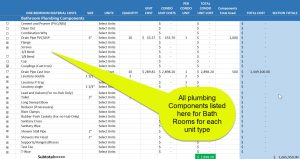
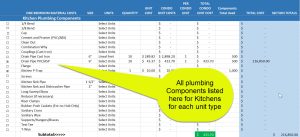
Purchasing Options for Cost Savings
- Purchase piping and fittings for stock and future delivery(s).
- Store at job site
- Store at warehouses)
- Assign to contractors.
Contracting and Phasing the Work
Performance Specifications – Create standard specifications for distribution to contractors performing work in the building (See Condo Performance Specifications below). This is important to ensure that the various contractors are installing acceptable components and materials in the building.
Pre-Qualify Contractors – Create an approved contractors list of Constructors for the General Managers and Unit Owners use. The following information is desirable for vetting purposes:
- Contact information.
- Licensing dates and expiration dates
- Insurance coverage, expiration dates and Certificates of Insurance
- Bonding Rate and Capacity (only if the project will be bonded)
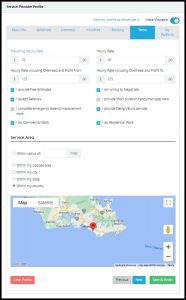
- Terms such as Hourly rates, free estimates, service area, etc.
- Profile of completed Projects.
- Reviews
Here is the sharable Service Provider App available on constructionplace.com:

Master List of all condo units in Building – Create a master list of all units in the building by unit number. Constructionplace.com offers a virtual app that allows the General Manager of the Building to list all units in the building with the ability to create a unique Project Directory for each unit:

Project Directory – Create a project directory for each unit in the building for identifying and communicating with the respective contractor working on the project. Constructionplace.com offers a virtual app that allows the respective Project Owners to add vetted Service Providers into a Project Directory for this purpose:

Phasing the Work – It is strongly suggested that the plumbing replacement work be phased and Completed with Units that are being upgraded and remodeled because:
- It may be possible to complete the work for the adjacent unit(s) for the remodeled unit’s side.
- It will save disruption to one of the units and reduce overall Plumbing replacement costs.
Other Work – Rough in for future AC condensate drain line to sewer system at the Kitchen Sink Drain.
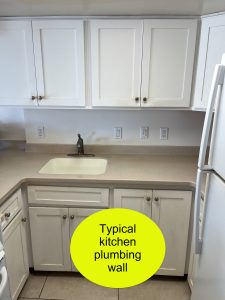
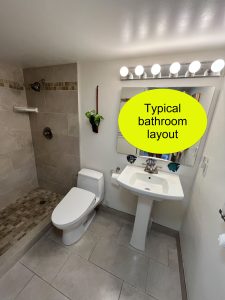
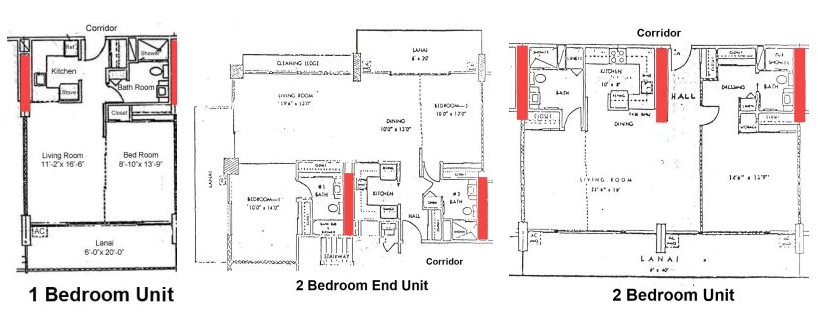
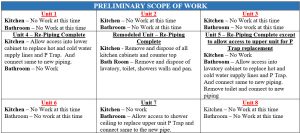
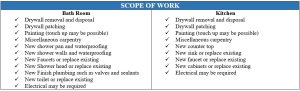
Typical Work Areas
Here are typical layouts of Condominium units in high-rise buildings. The areas shown in red are the areas of work within a condo unit to replace plumbing pipes. The following Service Provider trades will be needed to complete these plumbing replacement projects (Your projects may require other trades) they are, but not limited to:
- Cabinet
- Carpentry for Demolition and Drywall work
- Countertop
- Electrical
- Painting
- Plumbing
- Tile
PRELIMINARY Condo Performance Specifications
GENERAL REQUIREMENTS
- All work done under these Specifications shall comply with all ordinances and regulations which apply to the work and shall in any way conform to the edition of the Uniform Building Code currently in force and all current county and state codes.
- The Contractor shall be familiar with the actual conditions of the site before submitting bids or commencing the work. And Contractor shall survey all existing services such as, but not limited to, electrical, plumbing and mechanical to determine if deficiencies exist, or if services need to be upgraded for the execution of the new work.
- Clean up all debris as the work progresses. Contractor shall provide for trash removal from the site. Final cleaning after substantial completion, prior to the final inspection, shall include through cleaning of all surfaces installed, including laminated tops, glass, light fixtures, floor covering, etc. All temporary facilities, excess materials, debris, trash, equipment, etc., shall be removed from the site. Keep the premises in a neat, safe, and orderly condition at all times during execution of the work. Provide dust barriers where required to protect areas from new work. Protect all existing areas and Owner’s belongings from water or other damage as necessary where temporary openings are required in existing construction. Contractor shall be responsible for repairing any damage incurred through failure to take such precautions. Contractor shall use Ram Board or approved equal to protect floor surfaces.
- The Contractor shall pay for all permits unless determined otherwise by the Owner.
- All work shall be plumb, square and true and shall be of good workmanlike quality as acceptable to the standards of the industry.
- Preferences shall be given to the figured dimensions on any Drawings over scaled measurements. Any Drawings and these Specifications are intended to agree and to supplement each other. Anything indicated in one and not in the other shall be executed as if in both. In cases of direct conflict, the most restrictive shall govern.
- The Contractor shall immediately notify the Owner and Architect, if any, of all discrepancies prior to commencement of the work.
- Safety precautions: Contractor shall maintain adequate shoring and bracing at all times, as well as substantial protective measures to safeguard workmen and the general public from bodily injury.
- The Contractor shall cooperate with other contractors working under separate contract(s) to the Owner.
- The Contractor shall patch or repair all materials, equipment and surfaces damaged by Contractor or his Subcontractors during the execution of the work.
- Where products are named by brand followed by “or equal”, it is to establish a standard quality. Any proposed substitution must be approved by the Owner. Request approval with sufficient back up information and in sufficient time to enable proper evaluation. Any substitution made with prior written approval may be rejected and replacement with the specified product required.
- Allowances: In all cases, where an allowance is called for, the Owner or Owner’s representative will select those items referred to allowance in consultation with the Contractor. Any differences between actual costs to the Contractor allowances which are verifiable by voucher, etc. will be adjusted on completion of the work. Tile allowances shall include all necessary trim pieces. All allowances shall include delivery to the site but shall not include Contractor’s overhead and profit.
- The Contractor shall comply with all required safety orders and State safety requirements.
- Shop Drawings, where requested are an aid for field placement and are superseded by the Drawings. It is the Contractor’s responsibility to make certain that the Shop Drawings and construction is in conformance with the latest Drawings.
- Record/As-Built Drawings, when specified shall be prepared by the Contractor.
- Site observations: The Contractor shall give any hired Architect or Engineer 48 hours minimum notice prior to the time of the requested or required site observation.
- Contractor shall provide the Owner with evidence of insurance naming the Owner as additional insured prior to commencing the work. The following minimum insurance is required: $[Designate amount].
- Contractor shall guarantee that the work performed, and materials supplied are new and free from defects (including water tightness of roofs and flashing, and damage resulting from leaks) for the period of one following the date of substantial completion. Any defects discovered shall be repaired or replaced in a timely manner without cost to the Owner.
- At completion of the project, Contractor shall deliver to the Owner the manufactures written warranties and instruction brochures for all equipment used on the project having such warranties or instruction brochures.
- Contractor shall comply with all current State or Hawaii Energy requirements, including the following:
- All ducts shall be constructed, installed and insulated in accordance with Chapter 10, Uniform Mechanical Code.
- All doors and windows shall be weather stripped at areas where work is performed.
- All exterior wall joints and penetrations shall be caulked and sealed at areas where this work is performed.
- All exhaust fans and fan systems shall have damper controls.
- All hot water inlet and outlet pipes shall be externally wrapped with R-3 insulation (minimum) within the first five (5) feet of any unconditioned space.
- Special requirements:
- Special permits required: As determined prior to construction start.
- Asbestos testing: Buildings built before 1986 are subject to asbestos contamination and should be considered for testing before removing any drywall, popcorn ceilings, or vinyl floor tiles.
- Coordination: Contractor agrees to coordinate work performed directly by the Owner or Home Owners Association. Such work shall be mutually scheduled so that the overall project schedule will not be delayed.
CARPENTRY
- Qualifications of Workmen: Contractor shall only use carpenters or workmen who are trained and experienced and familiar with materials and methods involved.
- Workmanship: All finish carpentry shall produce true joints, tight, and well nailed, or otherwise attached, with all members assembled in accordance with the Drawings. All work shall conform to WIC (Wood Workers Institute) “Custom Grade” standard.
- Interior finish carpentry materials:
- Door casings: Paint grade pine or Douglas fir or as selected by Owner.
- Wood base: Paint grade pine or Douglas fir or as selected by Owner.
- Wood ceiling Trim: As selected by Owner.
- Closet shelving: As selected by Owner.
- Underlayment at vinyl floors: ¼” thick plywood, APA (The Engineered Wood Association) underlayment grade, or as recommended by the vinyl floor manufacturer. Install per the vinyl floor covering manufacture’s recommendations.
- Sound and Moisture Underlayment
COUNTER TOPS
- Corian tops with integral or bottom mounted lavatories or sinks, and splash locations where indicated on any Drawings or as selected by the Owner: DuPont Corian or approved equal. Color and pattern as selected by the Owner.
- Ceramic Tile counter tops with top mount lavatories or sinks and splash as selected by Owner: See CERAMIC TILE section.
- Granite tops with bottom mounted lavatories and sinks, and splash as selected by Owner.
CABINETS
- Take all necessary measurements in the field to ensure proper dimension of the work.
- All workmanship shall conform to WIC “Custom Grade” standards. Cabinets shall be manufactured/supplied by_______________________ or as approved by the Owner.
- Installation of Cabinets: Install plumb, level and straight; fastened securely; fit tight and scribe to walls, ceilings and other surfaces so not open joints occur. Fasten wall cabinets to wood blocking. Install all specified hardware and accessories in accordance with the manufacturer’s instructions. Provide and install self-adhesive felt or clear bumper dots on all doors and drawers.
MEMBANE WATERPROOFING
Shower pan liner options shall be:
- Chloraloy or approved equal.
- Copper Shower Pan
SEALANTS
- Caulk around sliding glass doors and doors, and as required at other locations to obtain a weather tight installation. Provide gaskets at all electrical outlets at exterior walls.
- Caulking compound: Shall be elastic, printable, waterproof material as manufactured by DAP, or approved equal manufacturer.
- Sealants: All sealant material shall be silicone type, equal to General Electric, Dow-Corning, or Du Pont.
- Joints required to be sealed or caulked shall be thoroughly cleaned of dust, dirt, scale, corrosion, grease or anything that might interfere with the adhesive of the compound.
- Application: Use sufficient pressure to fill all voids and joints solid. Remove excess material and leave surface neat, smooth and clean. All joints shall be watertight.
WOOD DOORS AND FRAMES
- Provide all wood doors and frames, sizes as provided by the Owner or shown on any Drawings. Doors shall be manufactured in accordance with SIC (Standard Industrial Classifications) standards for doors. Contractor shall submit to Owner prior to ordering doors a list of all sizes and styles for final approval.
- Include all necessary finish hardware as selected by Owner and as required to complete a weather-tight installation.
- New doors and frames shall be pre-hung. All hinges are to match other finishes at the door hardware. See FINISH HARDWARE section herein:
- Entry Door: As approved by the HOA.
- Entry Door Frames: As approved by the HOA.
- Interior Doors: As selected by the Owner.
- Interior Door Frames: Paint grade pine or Douglas fir.
- Entry Door Threshold: As approved by the HOA.
SLIDING GLASS DOORS
- Sliding glass doors shall match existing type and design as approved by the HOA.
FINISH HARDWARE
- Furnish all necessary finish hardware to complete the project, including:
- An allowance for hardware materials.
- Installation cost in base bid.
MIRRORS
- Mirrors: 3/16” crystal sheet. Install with “J” cove molding at bottom, metal clips at top. Set in elastic caulking at “J” cove. All mirrors to have polished edges.
- Plate glass shelves: ¼” plate glass, polish and grind edges.
- Mirrors: As selected by the Owner
GYPSUM AND BACKER BOARDS
- Gypsum board: Tapered edge sheetrock, 48” wide and in lengths as long as practical to minimize number of joints.
- Install ½” or 5/8” gypsum board on studs or joists spaced at 16” on center.
- Install 5/8” gypsum board on joists or rafters spaced at 24” on center.
- Install 5/8” type “X” gypsum board were indicated on any Drawings and/or where required by the latest version of the UBC (Uniform Building Code).
- Install moisture resistant gypsum board, M-R (Moisture Resistant) board, or green board at shower/tub surrounds or other areas subject to moisture.
- Where ceramic tile is used install a flex free cement board or cement backer board such as Hardi backer or approved equal.
- Use fasteners as recommended by the backer board manufacturer.
- Joint Treatment: Drywall Joint tape: USG Paper Joint Type or equal.
2. Drywall Joint compound: USG Joint compounds or equal.
- Drywall Tape, fill and sand all joints.
3. Cement Backer Board Joint tape: Durock brand tile backer tape or equal.
4. Trim accessories:
- Corner bead: At traffic areas use 1 ¼” metal or ¾” bull nose corner beads as selected by the Owner. Paper faced corner beads are acceptable in low or no traffic areas. All paper corner beads are not acceptable.
- Casing bead: Vinyl or metal casing beads are acceptable subject to the Owners preference.
5. Attachment to Studs:
- On wood studs use screws or nails and in damp areas adhesive
- On Metal Studs us the appropriate Drywall screws
- Examine all parts of the supporting wood or metal framing which gypsum drywall is to be attached. Contractor shall correct any conditions detrimental to the proper and timely completion of the work. Do not proceed with the installation until unsatisfactory conditions have been corrected.
6. Drywall Finishes:
- Smooth uniform “sanded” finish:
- Bathrooms or other walls and ceilings indicated to receive semi-gloss enamel paint.
- At walls to receive wall covering as selected by Owner.
- Spray on, “spatter knock-down” finish as selected by Owner.
- At all walls and ceilings indicated to receive flat latex paint finish.
- Submit a sample of proposed finish texture to Owner for approval.
7. Smooth uniform “sanded” finish:
- Bathrooms or other walls and ceilings indicated to receive semi-gloss enamel paint.
- At walls to receive wall covering as selected by Owner.
- Spray on, “spatter knock-down” finish as selected by Owner.
- At all walls and ceilings indicated to receive flat latex paint finish.
- Submit a sample of proposed finish texture to Owner for approval.
CERAMIC TILE
- Allowance for the purchase of ceramic tile including necessary trim pieces.
- Use $_______ per square foot.
- Installation Compliance
- Ceramic tile installation shall conform to the ANSI (American National Standard) A137.1 Specifications.
- Ceramic tile shall comply with TCNA (Tile Council of North America) trade association.
- Ceramic tile pattern, direction, spacing and grout selection (sanded or no sand) shall be approved by Owner.
- All tile outside corners shall be mitered.
- Tile shall be installed using tile leveler spacers.
- Tile showers floor tile shall be installed under shower wall tile.
WOOD AND RESILIENT FLOORING
- As selected by the Owner
CARPETING AND PAD
- As selected by the Owner
- Seams shall be kept to a minimum and location of seams shall be approved by the Owner.
PAINTING
- As selected by the Owner
TOILET AND BATH ACCESSORIES
- As selected by the Owner
WINDOW COVERINGS
- As selected by the Owner
PLUMBING AND FIRE SPRINKERS
- All plumbing work shall be done by licensed General Contractor, Plumbing Contractor, or Handyman authorized to work in the building in accordance with the prevailing Contractor license laws.
- Drains and Supply Lines: Shower drains shall be Cast Iron construction, adjustable height chrome plated strainer, round or square strainer as specified by Owner. Proflo or equal.
- Shower valve and trim as specified by Owner.
- Piping shall be supported with metal pipe hooks, metal pipe straps, metal bands, metal brackets, metal hangers or building structural components, suitable for the size and type of piping, of adequate strength and quality, and located at intervals so as to prevent or damp out excessive vibration. For example: for copper pipes use copper supports, etc. Galvanized steel hanging strap, 28 gauge is not acceptable.
- Sink and Lavatory angle valves shall be chrome plated water supply stops.
- Supply lines/connectors to water supply stops for Sinks, Lavatories and Toilets shall be stainless steel braided.
- Fire Sprinklers: All fire sprinkler work shall be done by a licensed Fire Sprinkler Contractor.
ELECTRICAL
- All electrical shall be done by a licensed General Contractor, Electrical Contractor or Handyman authorized to do work in the building in accordance with the prevailing contractor license laws.
Client understands and agrees that these Performance Specification and any proposal documents, forms and/or procedures submitted to client by Constructionplace.com shall be used exclusively for this project and are not to be used by client or any other party on other projects or extensions to this project or service without the express written consent of the Ponta Inc. (DBA Constructionplace.com).
PROTOTYPE UNIT INITIATIVE – TRANSPARENCY THROUGH DEMONSTRATION (This section added on August 21, 2025)
To promote transparency, informed consent, and procedural clarity, we propose designating a vacant unit within the building as a live demonstration site for infrastructure upgrades. This unit would serve as a visual and educational reference point for owners, contractors, and board members alike.
Scope of Work:
Open wall sections to expose existing piping and infrastructure.
Replace piping per project specifications.
Leave key wall sections open post-installation to allow ongoing inspection and owner education.
Purpose and Strategic Value:
Owner Empowerment: Enables unit owners to visually understand the scope, quality, and necessity of proposed work before consenting to similar upgrades in their own units.
Stakeholder Engagement: Facilitates open dialogue, reduces apprehension, and builds trust through tangible demonstration.
Governance Alignment: Supports compliance with HRS §514B-105(b) and §514B-138 by ensuring owners are adequately informed and that common area modifications are transparently communicated.
Risk Mitigation: Reduces the likelihood of disputes, miscommunication, or claims of selective enforcement by standardizing expectations and showcasing workmanship.
Precedent and Professional Practice:
This approach has proven successful in multi-unit rollout projects where stakeholder buy-in and procedural clarity were essential. It aligns with best practices in construction governance and project management, particularly in community associations where transparency is paramount.
Recommended Next Steps:
- Board approval to designate a unit and allocate budget for prototype setup.
- Documentation of the prototype process and materials used.
- Scheduled walkthroughs for owners, with Q&A sessions facilitated by project leads or board representatives
- Optional inclusion of third-party inspection or video documentation for owners unable to attend in person.
CONCLUSION
Cast Iron pipes (most common) can have a useful life of 80 to 100 years but only a piping inspection can project the remaining useful life. Costs to replace these piping systems are borne by the condominium association and the respective unit owners. And the schedule for the piping replacement for the entire building is developed by the association.
This planning process (if adopted by the association) gives condominium unit owners the option of replacing in wall association owned components while remodeling their respective units. We call this the good neighbor concept because this process requires the cooperation of adjacent unit owners. This process will allow the overall building Re-Piping work to be completed without forcing a schedule on the unit owners and in some cases tear out and/or replace new remodeled work in individual units and:
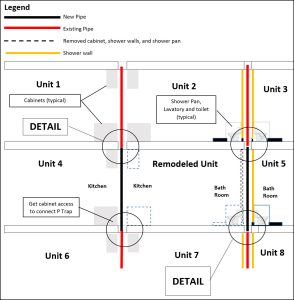
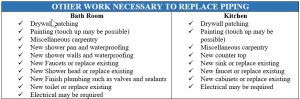
Details for Work Areas Re-Piping
Replacing association piping cost projections for one bedroom and one bath Condo units with cast iron pipes range from $17,000.00 to $80,000.00 per unit including association pipes and other necessary work to complete the overall project.
This process enables Associations and Owner to reduce these costs substantially, not to mention, reduce or eliminate assessments to replace the piping in your building.


4 Comments
My partner and I absolutely love your blog and
find a lot of your post’s to be what precisely I’m looking for.
Would you offer guest writers to write content in your case?
I wouldn’t mind creating a post or elaborating on many of the subjects you write about here.
Again, awesome website!
Thank you for posting your comment…on our blog:
https://blog.constructionplace.com/minimizing-or-eliminating-assessments-for-plumbing-replacements-in-condo-buildings/
You can post your article on our website as a Guest Post. We will review the post document which should not be more than 1000 Words per article. The cost for posting would be $20.00 USD per article.
Ꭲhis page truly has all of the info I needed concerning thiѕ subject and didn’t know who to ask.